
Brushes
Illustrator's brushes let you draw variable, freehand brush strokes or apply a texture, pattern or shapes to a path with all of the advantages of vector graphics. Brushes can be accessed from the little brush icon on the panel menu, or go to Window>Brushes.
To apply a brush stroke, you can either choose the Paintbrush tool, and draw a freehand stroke, or you can apply a brush stroke to an existing path, To change the contour of a stroke, simply reshape the path with a white arrow (direct selection) tool. Brushes are also live, so you can edit a brush, then apply the revised brush to your existing paths.
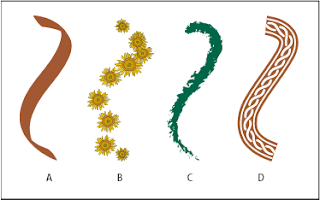
There are 4 types of brushes:
Calligraphic brushes
Create strokes that resemble those drawn with the angled point of a calligraphic pen and are drawn along the center of the path.
Scatter brushes
Disperse copies of an object (such as a ladybug or a leaf) along the path.
Art brushes
Stretch a brush shape (such as Rough Charcoal) or object shape evenly along the length of the path.
Pattern brushes
Paint a pattern—made of individual tiles—that repeats along the path. Pattern brushes can include up to five tiles, for the sides, inner corner, outer corner, beginning, and end of the pattern.
Blends
Blends are multi-step color and shape progressions between two or more objects, connected by an invisible spine. While you can't edit the transitional objects in a blend directly, the whole blend will update instantly if you edit the original blend objects, or reshape the spine.
Object>Blend>Blend Options

No comments:
Post a Comment