Thursday, November 18, 2010

Class 7


Brushes
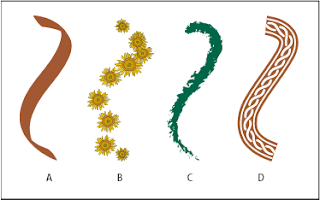
Illustrator's brushes let you draw variable, freehand brush strokes or apply a texture, pattern or shapes to a path with all of the advantages of vector graphics. Brushes can be accessed from the little brush icon on the panel menu, or go to Window>Brushes.

To apply a brush stroke, you can either choose the Paintbrush tool, and draw a freehand stroke, or you can apply a brush stroke to an existing path, To change the contour of a stroke, simply reshape the path with a white arrow (direct selection) tool. Brushes are also live, so you can edit a brush, then apply the revised brush to your existing paths.

There are 4 types of brushes:

Calligraphic brushes
Create strokes that resemble those drawn with the angled point of a calligraphic pen and are drawn along the center of the path.

Scatter brushes
Disperse copies of an object (such as a ladybug or a leaf) along the path.

Art brushes
Stretch a brush shape (such as Rough Charcoal) or object shape evenly along the length of the path.

Pattern brushes
Paint a pattern—made of individual tiles—that repeats along the path. Pattern brushes can include up to five tiles, for the sides, inner corner, outer corner, beginning, and end of the pattern.


Blends
Blends are multi-step color and shape progressions between two or more objects, connected by an invisible spine. While you can't edit the transitional objects in a blend directly, the whole blend will update instantly if you edit the original blend objects, or reshape the spine.

Object>Blend>Blend Options

Color Notes


Some Basics
Additive vs. Subtractive
RGB uses additive color mixing, because it describes what kind of light needs to be emitted to produce a given color. Light is added together to create form from out of the darkness. RGB stores individual values for red, green and blue. RGBA is RGB with an additional channel, alpha, to indicate transparency.

CMYK uses subtractive color mixing used in the printing process, because it describes what kind of inks need to be applied so the light reflected from the substrate and through the inks produces a given color. One starts with a white substrate (canvas, page, etc.), and uses ink to subtract color from white to create an image. CMYK stores ink values for cyan, magenta, yellow and black. There are many CMYK color spaces for different sets of inks, substrates, and press characteristics (which change the dot gain or transfer function for each ink and thus change the appearance).

Gamut-Gamut is the term for the range of colors that can be represented in a given color model (RGB, CMYK, etc.) or a given output device (computer monitor, desktop printer, 4 color process, etc.). In Adobe programs, you can see when a selected color is out of gamut by the little triangle shaped warning sign that appears next to the color.

Color Space-The gamut, or available color range, of a device is called the "color space" of that device.

Color Profiles-The mathematical description of a device's color space is called the "color profile."

Color Management- A color management system (such as Adobe's) acts as the color interpreter, and uses the color profile of a given output device (printer) to keep your colors looking accurate.

In Illustrator, most color management controls can be found under Edit>Color Settings. When you place your mouse over a setting, you'll get a handy dialog box telling you the best circumstances to use various color profiles and management policies.

In light of the new capabilities of digital imaging it is recommended that you work in the RGB color space. Keep an original archive of the image in RGB format for additional jobs run on different output devices. Once a file is saved in a smaller color space, such as CMYK, the colors outside of that space are lost. Resaving the file in RGB will not replace the missing colors. Let your service provider modify the color space to best suit your output needs. It’s a good idea to contact your service provider and discuss color issues if you have any questions concerning color space requirements.

Here's a handy site with some useful printing tips: http://www.printernational.org/

Thursday, November 11, 2010

Class 6


Importing and Editing Raster Images
Today's lesson will cover Acquiring raster images in Illustrator, as well as prepping for print.

There are several different ways to get a raster image into Illustrator:
File>Open
File>Place
Drag and Drop

• Linked Files
A link is a placeholder image that links to an accompanying raster file. This keeps your file from getting too large, but to edit you must either open the original application or embed the image into the Illustrator document. In order to print properly, the original file must be available on the hard drive.

Recommended Formats for Linked Images: EPS, TIFF, PDF

• Embedded Files
Embedded files are actual raster objects placed into the Illustrator document. This allows for some editing, but at the cost of larger file size. If you are importing a layered Photoshop Document, you can choose whether to flatten the image, or bring all of the layers over as a group (with each Photoshop layer nested in sub-layers.)

A bitmap that you aquire in illustrator via the Open, Place, or Drag-and-drop method can be moved, placed on a different layer, masked, modified using any transformation tool, or modified using raster filters. All three methods preserve the resolution of the original image.

Effects

Effects
-Change the appearance of the path (editable in the Appearance panel) and can be edited or deleted at any time. When you edit the underlying path, the effects adjust accordingly. You can even apply effects to editable type! With a few exceptions, effects are vector, and output as vectors.

The Photoshop Effects (on the bottom part of the Effects Menu) are all raster, meaning they're rasterized on output even when exported to a vector format.

You can control the rasterization process by choosing Effect>Document Raster Effects Settings.

Printing Checklist
Save as EPS

Flatten Transparencies

Convert All Type to Outlines

Make sure all raster images are at least 300dpi

Make sure the document is CMYK. The Visual Quickstart Guide suggests converting any raster images to CMYK in Photoshop, saving them as a PSD, then using the Place command to acquire the image.

Where possible, link files rather than embed them.