Thursday, September 30, 2010

Class #1


Illustrator creates art out of shapes. These shapes are comprised of paths (the line of edge of a shape) and anchor points (the little boxes along the edge of the shape. By adding to, subtracting from, and stacking various shapes, you can create all kinds of images. Here's a recap of some essentials.

Tools:
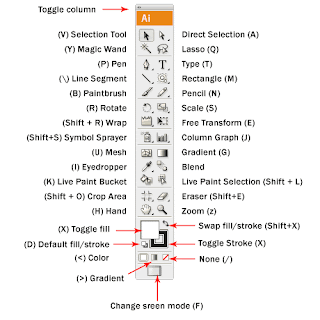
• Selection Arrow (V): Selects shapes in their entirety. Allows you to scale, squash, stretch, move, and change the color/stroke of an object. You can also drag a box around multiple shapes to select multiple shapes at once!

• Direct Selection Arrow (A): Selects a path segment or anchor point, depending on where you click. You can pull the anchor points themselves to distort the shape, or use the handles to adjust the curves. This allows for much greater and precise control over an object than the simple Selection Arrow.

•Ellipse (L), Rectangle (M), and other shapes: Basic shape making tools. Click and drag to make a shape, or simply click and type the shape dimensions in the dialog box. Shapes are always editable.

• Arrange the stacking order of objects by going to the top of your screen and selecting Object > Arrange, then picking which direction you'd like to send the shape(s) in question. The shortcut to send an object back or forward a layer is Command + [ or Command + ].

Handy Mouse and Keyboard Functions:

• Hold the shift key while dragging to create shapes in perfect dimensions (circles, squares, etc.).

• Hold the shift key while moving a shape to move it in perfect alignment vertically or horizontally from its original position.

• Hold the option key while moving a shape to create a duplicate. If you hold shift and option together while moving a shape, you can create a duplicate shape and move it in perfect alignment to the original. Very handy when trying to create orderly rows of identical objects (like stars on a flag)!

Other Useful Bits:

• Templates: In the layers panel, click on the drop down menu to the right of the word "Layers". Select template, then make a new layer above it to work on. This allows you to trace imported images. Remember, the idea is to use imported images as template to base your new art on, not as a part of the art itself.

• To get a better view of what you are tracing, hit Command + Y to go into Outline Mode. Command + Y again takes you back out. If you're stuck, and you don't see any colors or fills in your shapes, you may be in Outline Mode inadvertently. Watch out!

Colors:

• Color is edited on bottom of the toolbox. To edit the color of an object, click on the Fill color box (left box). To edit the outline color of an object, click on the Stroke color box (right box). You can also set either to none, using the None button to the lower right of the Stroke box.

• Pick colors by double clicking on the Fill or Stroke box, then use the picker to select a new color. You can also select colors from the swatch panel on the right side of the screen.

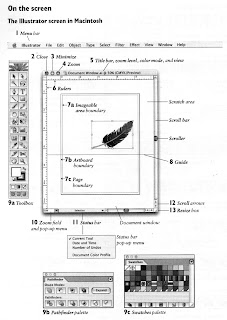
*If you can't find a specific panel in any Adobe program, click on "Window" at the top of the screen, then click on the window that you are looking for.

What is Illustrator?


Vector Graphics
Illustrator is Adobe's vector graphics editing program, and is currently the industry standard. To understand Illustrator, you must first have an understanding of what exactly vector graphics are, their function, and how they relate to other graphic formats. Here's what Wikipedia has to say on the subject:

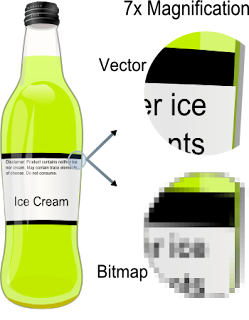
Computer displays are made up from grids of small rectangular cells called pixels. The picture is built up from these cells. The smaller and closer the cells are together, the better the quality of the image, but the bigger the file needed to store the data. If the number of pixels is kept constant, the size of each pixel will grow and the image becomes grainy (pixellated) when magnified, as the resolution of the eye enables it to pick out individual pixels.

Essentially, vector graphics files store the lines, shapes and colors that make up an image as mathematical formulae. A vector graphics program uses these mathematical formulae to construct the screen image, building the best quality image possible, given the screen resolution. The mathematical formulae determine where the dots that make up the image should be placed for the best results when displaying the image. Since these formulae can produce an image scalable to any size and detail, the quality of the image is limited only by the resolution of the display, and the file size of vector data generating the image stays the same.


What does all this technical jargon mean for you?

Basically, vector editors like Illustrator create art out of geometry. By adding to, subtracting from, and stacking various shapes, you can create all kinds of images. While Illustrator is a powerful and versatile program, its very shape-driven nature means it is best for creating things like:

• Page layout
• Typography
• Logos
• Sharp-edged artistic illustrations (e.g. cartoons, clip art, complex geometric patterns), technical illustrations, diagramming and flowcharting.

Welcome to Illustrator 101!

Class Overview
My name: Jeff Lance
My e-mail: jlance.1@go.ccad.edu
My phone: 301-467-1452

Class website: www.introtoillustrator.blogspot.com

Please feel free to get in touch with me with any questions you may have! I’m here to help and I sincerely want to help all of you understand Adobe Illustrator.

In addition, here are some handy websites with all sorts of tutorials. If I miss anything you’d like to see covered, chances are it’s on one of these:

http://www.adobeillustratortutorials.com/

http://illustrationinfo.com/?page_id=159

I’ll keep looking for additional resources as the semester goes on and send them to you as I find them.

Class Structure
Most of the class time will be spent on hands-on exercises—performed by the instructor while you repeat them on your individual computer. The experience level of each student will be assessed at the first class and the range of experience within the class will determine the pace of instruction. Everyone in the class is given time to accomplish each exercise. Naturally, a more similarly experienced group can move faster at their designated level than a class with widely varying levels.

• Please feel free to ask questions at any time.

• If you think you can help someone who is having trouble in the class and the instructor is working with another student, please feel free to offer help. There is usually a broad range of skills in every class.

Attendance
This is a non credit complete/incomplete class. You are allowed to miss up to 2 classes per semester to receive a “complete” status for the semester. Notify the instructor if you need to miss a class. Tardiness is disruptive to the pace of the class, try to be on time. Notify the instructor, via cell if necessary, if you are going to be more than 15 minutes late. With few exceptions, 30 minutes late is considered a missed class.

Homework
You retain very little of this instruction if you do not follow up on your own between classes. Repeating the class exercise in addition to the homework is recommended to advance your competency in the programs. Many of the assignments come from the recommended text and can be done independently. Classes will begin with a review of homework assignments from the previous week. Please also be prepared to discuss any computer obstacles or successes experienced during the week. You should begin early to think of real applications for what you are learning in class. These applications can be for work or a personal interest and can become your independent project for the last class.

Store and Transfer files

You should save the work done in class to transfer to your home computer. The best method to do this is to bring in a flash drive. They are small and the price is based on the memory size. Get the most memory you can afford and a minimum of 512mb (1gb is more useful). This is also a useful device for bringing your homework to class if you cannot bring in a hard copy.

Open Lab Hours

One or both of the computer labs will be open certain hours for students needing to use the equipment at the college to review and do homework assignments. Refer to the Lab Schedule posted on the Lab doors to see the times designated for open lab time. There is an alternate lab at the Student Technology Center (STC). The hours of operation are 7:30 am - 10pm Mondays -Thursdays; 8:00 am - 5 pm Fridays; 9:00 am - 5 pm Saturdays; 9:00 am - 5 pm Sundays.

Here’s a link for more info: http://cms.montgomerycollege.edu/oit/InTech.aspx?id=217

General Rules/Policies:

• Please quit all applications after use.
• Lab Macs should never be shut down.
• Do not turn off monitors
• Trash all personal files on the computer desktops and empty the trash.
• Push in chairs when class is finished.
• Pick up all papers etc, so the next class will enter an orderly environment
• You may restart computers if frozen.
• Absolutely no food or drink in the labs
• No external music allowed in the labs (headphones only are permitted during lab time)
• No external devices are permitted to be connected to the lab computers